I am so very fond of little {...or perhaps NOT so little} "trees" that are made from fallen tree branches. They can be such a big + bold centerpiece, yet they are quite delicate. And they cost next to nothing to make; compared with what one might spend in a shop for such a large peice of home decor! I also love being able to give them a seasonal theme...like our Halloween Tree + our more recent Winter Tree. I had grown quite attached to our Winter Tree. So much so that when the time came to take it down, I packed away the crystals + silver walnuts but left the vase + empty branches right where they were. There had to be something fun, yet classy that I could do with this "tree" that would take us through the Spring/ Easter season? Alas there was something! And I am ever so pleased with how this turned out!
 I found a jar of these great little flowers {in assorted sizes} on sale in the craft store. They looked as if they had been made from old newspapers...very fun, yet also kind of neutral. I have a fetish for mixing things that seem more natural/organic with elements that are on the flashy side. Even when it comes to clothes, I love wearing jeans + a vintage CBGB's t-shirt...with a fablous cardigan complete with jeweled buttons. Know what I mean? It just works for me...and so that is what I decided I'd do here too...
  I could have used blown eggs for this project, but that can be messy...and I really liked the idea of having different sized eggs on the tree. {After all, nothing says Spring! or Easter! like eggs.} Instead I opted for a package of 6 standard sized papermache eggs and some smaller faux eggs I happened accross in Marshalls {I have no idea what they are made of, but they are light weight.} FYI: I attempted spray painting some of the eggs, but wouldn't avise it unless it was only meant as a basecoat before your glue + glitter. The paint might {DOES!} react strangely based on what your are spraying it on...trust me, I tried it! I stuck to using Modge Podge glue to paint the eggs with, then I sprinked...no, I COATED them in some silver Martha Stewart mini-super-fine-glitter. I left them to dry over night.
  I had bought a branch of faux green hydrangea in the floral section of the craft sore and proceeded to pick apart the flowers so they were only fabric pieces. I used hot glue to layer them at the bottom of the egg so they almost looked as if the little eggs were blooming from tiny cabbages. I used some leftover scrapbooking type flowers {I had from the Fif's Bday party craft last spring} which I used at the top of the egg to help conceal the bit of white thread I glued to hang my eggs from.
  Later, after flowers were hot glued to the branches + the glittery eggs were hung, I decided to add a few mini ceramic teacups + saucers that I happened to have. The yellow color really complimented the one pre-made little easter-banner-ornament I bought at the craft store. It had chicks on it, I couldn't resist! I really like that the tiny cups serve as more of a cause for a double-take than anything else as they might not be something you'd expect to see perched on the branches of a Springtime Tree. However, when I think of spring; all life hatching + growing, flowers budding + little tea party picnics out-of-doors...well, perhaps they are rather apropos after all!
 I had grown quite attached to our Winter Tree. So much so that when the time came to take it down, I packed away the crystals + silver walnuts but left the vase + empty branches right where they were. There had to be something fun, yet classy that I could do with this "tree" that would take us through the Spring/ Easter season? Alas there was something! And I am ever so pleased with how this turned out!I found a jar of these great little flowers {in assorted sizes} on sale in the craft store. They looked as if they had been made from old newspapers...very fun, yet also kind of neutral. I have a fetish for mixing things that seem more natural/organic with elements that are on the flashy side. Even when it comes to clothes, I love wearing jeans + a vintage CBGB's t-shirt...with a fablous cardigan complete with jeweled buttons. Know what I mean? It just works for me...and so that is what I decided I'd do here too...
  I could have used blown eggs for this project, but that can be messy...and I really liked the idea of having different sized eggs on the tree. {After all, nothing says Spring! or Easter! like eggs.} Instead I opted for a package of 6 standard sized papermache eggs and some smaller faux eggs I happened accross in Marshalls {I have no idea what they are made of, but they are light weight.} FYI: I attempted spray painting some of the eggs, but wouldn't avise it unless it was only meant as a basecoat before your glue + glitter. The paint might {DOES!} react strangely based on what your are spraying it on...trust me, I tried it! I stuck to using Modge Podge glue to paint the eggs with, then I sprinked...no, I COATED them in some silver Martha Stewart mini-super-fine-glitter. I left them to dry over night.
  I had bought a branch of faux green hydrangea in the floral section of the craft sore and proceeded to pick apart the flowers so they were only fabric pieces. I used hot glue to layer them at the bottom of the egg so they almost looked as if the little eggs were blooming from tiny cabbages. I used some leftover scrapbooking type flowers {I had from the Fif's Bday party craft last spring} which I used at the top of the egg to help conceal the bit of white thread I glued to hang my eggs from.
 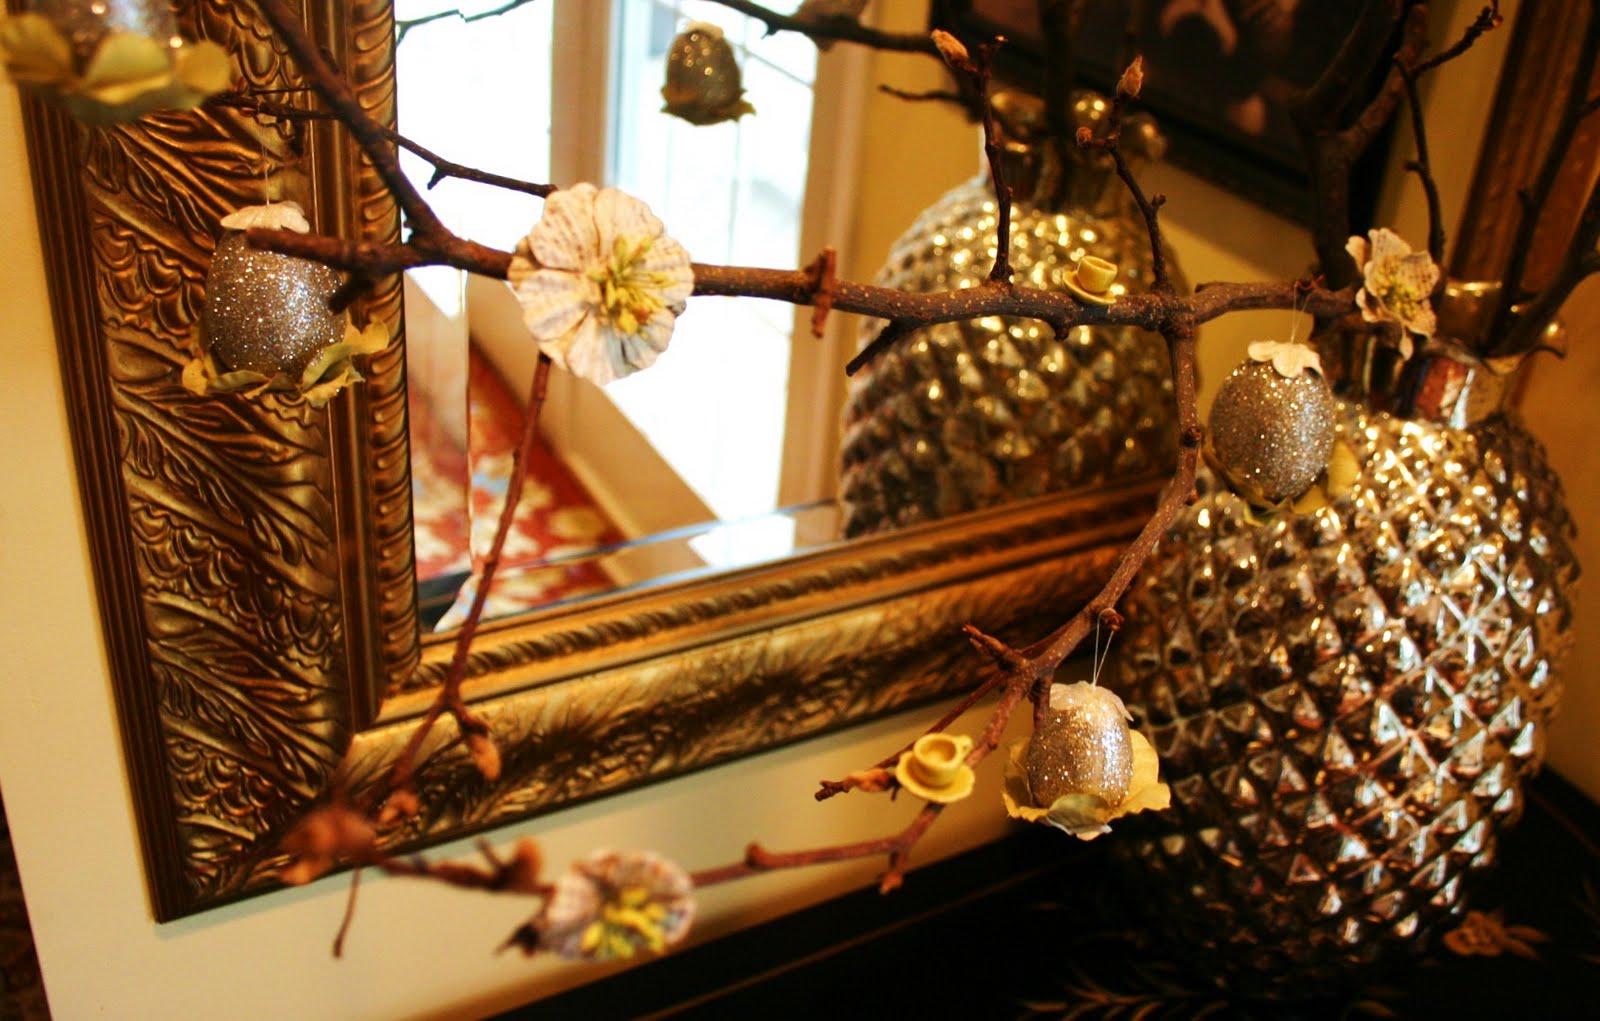 Later, after flowers were hot glued to the branches + the glittery eggs were hung, I decided to add a few mini ceramic teacups + saucers that I happened to have. The yellow color really complimented the one pre-made little easter-banner-ornament I bought at the craft store. It had chicks on it, I couldn't resist! I really like that the tiny cups serve as more of a cause for a double-take than anything else as they might not be something you'd expect to see perched on the branches of a Springtime Tree. However, when I think of spring; all life hatching + growing, flowers budding + little tea party picnics out-of-doors...well, perhaps they are rather apropos after all!
Have a Wonderful Weekend!
xo.


Oh, I love it!!! Well done and TFS, http://monicalott.blogspot.com/
ReplyDelete